Showing posts with label workshop. Show all posts

Friday, February 11, 2011

Altered Photography Workshop - Kalamazoo Book Arts Center

On Sunday, I switched venues and taught at the Kalamazoo Book Arts Center.  On a record-setting low temperature degree day (-9 overnight), what better place to be than creating in a creative environment?  Here's the work from the day...

This was Jaclyn's first attempt.  Wow!  Enough said.

I love the harsh, graphic background of this against the softness and color of the flowers.  Jaclyn is a high school student in a rural district.  She told me that she doesn't have much exposure to art at her school.  Her grandparents, on the other hand, are well known artists in the area and certainly provide her with inspiration and the inclination to create.


Jill is an excellent photographer to begin with so she had to work with idea of making an already good photo interesting in another way.  She worked larger (8 x 10, I think).  The flower bloom on the left was stunning in its new bluish, pink color and her background was beautiful.  The scratched in flower to the far left was a try at eliminating a flower that was already there in the photo.  I don't think she likes this part of her work as much.  But, now she can scan the photo and crop that part of it out.  Magic!

Compare this finished photo with the one above when it was still work-in-progress.  She used paint markers to adjust her background because the paper/ink combination wasn't taking the watercolors the way it should.  I like how she made lemons out of lemonade and wound up with a photo that pops.


This is the work of Stephanie (in the middle).  She's a senior in High School and takes some photography classes.  What could be better than hanging out at the beach with your friends?  She used it all here:  scratching, sanding, painting, pasteling, markering.  She knows Photoshop so I'm envisioning a scan of this photo with additional digital manipulation.  Cool.

This was also created by Stephanie.  She highlighted Diesel's eyes by painting the background in similar colors.  It also makes the dog pop.  In the original photo the dog was on a boring tan sofa.  Probably a super nice sofa, but not so interesting in the world of altering photos!  Notice the tiny, little holes that outline the dog. 


This photo was altered by Doreen.  Her color palette is much more peaceful and thoughtful than the loud colors I typically go for.  The background on this butterfly photo continued to evolve as the afternoon went on.  She sanded off almost all the background of the original photo but left just enough to make it interesting.  At first quite flat with only one/two colors, it changed as she slowly layered watercolor, oil pastels, more watercolor and a bit more.  Very nice!
Doreen was experiencing problems with the photos she brought because of the way they were developed with indestructible paper/ink.  So, she tried one of my photos and did a great job with it.


This is the work of Molly.  She has taken another class from me and I've come to know her through other avenues as well.  She is a fun lady with lots of talent.  This is Devil's Tower, Wyoming.  She has worked the entire photo by scratching into the Tower, sanding on a texturing plate for the sky then carefully adding color in the spots she wanted it.  The result is that the photo is more powerful than it's 4" x 6" size would indicate.  It think it's great.


If you've read through all the captions you've probably noticed that there were a couple of glitches with the developing of some of the pictures.  As an instructor, this is so frustrating.  As a student, this is so frustrating.  I feel like I know the techniques I'm teaching pretty well and then a wrench is thrown into the works.  We adjusted.  Jill and Doreen were patient.

If you're interested in altering photos you need to know what's going on in the world of photo developing.  In the past, photos were developed and after time they would fade.  A drop of water could ruin a picture in seconds.  Photos were easily destructed.  Now, like all technology advancing at the speed of light, photo developing has changed.  HP features photo developing that is guaranteed not to fade for 200 years.  Other companies are doing all they can to progress as well.  For 99.9% of the market these are good/great improvements.  For those of us purposely trying to destroy aspects of the photos this becomes a huge problem. 

I think/I hope everyone went home with an understanding of how to alter photos by hand, despite some photo developing issues.  What fun it can be!

Lorrie

Tuesday, February 8, 2011

Altered Photography workshop - Art Center of Battle Creek

One weekend in January I taught Altered Photography to two groups of creative folks. 

On Saturday I headed over to the Art Center of Battle Creek.  It was my first time teaching at there and it was a positive experience.  So, from noon to three on a freezing cold, blizzardy day, we played with photos, watercolors, pastels, markers and various distressing tools like sandpaper, awls, needles and texturing plates.


This is Donna.  She had quite a few photos to choose from and worked wonderfully with her floral close ups.  The one on the left was from a black and white photo.  The one on the right has a wonderful background that was achieved by sanding over a textured polymer clay pattern plate.

This is Kari.  She's a mom that needs her creative fix once in a while.  Maintaining sanity is kind of important!  She did a great job with quite a few of her photos.  The one on the right was printed in black and white then she went in and highlighted the clothing by scratching in an outline/pattern.  Adding color was the last step.  The building on the right has a new background that is much more interesting than the original.

Here is the mom/daughter team of Kim and Morgan.  While hard to see it in this photo, the picture of the lone person on the beach used to have two people in it.  It amazes me that by using the simple techniques of sanding and painting, you can completely eliminate things in a photo.  Morgan had fun giving her cat a spot of supreme importance.  Of course, don't cats always think that they are of supreme importance?

This one and the following were created by Sandy.  Sandy, an art educator for many, many years, is now working on her masters in digital photography.  She took this class to see if there might be a good marriage between the two skill sets.  Yes, indeed!  It does have possibilities for a good marriage.


Many thanks ladies for taking the class.  I'm so pleased with your results.  I think those reading this will be happy to see what you accomplished in one short afternoon.  Now, everybody, go make some more!


Lorrie

Thursday, January 13, 2011

Altered Photography Workshop at the Battle Creek Art Center

Listed on my sidebar is my Altered Photography Workshop that will be happening at the Art Center of Battle Creek (Michigan) on Saturday, January 22. I've not taught here before so I'm looking forward to meeting some new folks in a new venue. An art friend, Kelly Parker, became the Director of Programming at the BCAC last year and she's added a slate of new, fun classes/workshops. Happily, mine is included.

You can find information on the class to the right of this post. Or, you can go to: the Art Center of Battle Creek. Or, you can contact me and I'll try to answer whatever questions you have. There is a bit of prep (you must get some photos developed ahead of the class) for this, so if you're interested and have Saturday open, get yourself registered! You can register for the class online.
Here's a sample of the types of things we'll be doing:


Here are pictures of work done by past students:


Fun stuff! Come join me.


Lorrie

Friday, September 24, 2010

Altered Photography with the Altered Sisters - Honorary Member for a Day

Here's another post about the altered photography play session with the Altered Sisters.  School was out at the time so I brought along my 11-year-old.  She had great fun playing around with the pens, inks, watercolors and scratching tools.  Here are her results...

Sculpture in Seattle


Turning her brother into a court jester on the soccer field.

Dash Abdo

Pelican on Marco Island

Our beloved Taylor looking like she has never looked before!  I really like what Alicia did with the palm tree trunk.


Altering photos can be a successful effort for creative people of almost any age.  Go for it.

Lorrie

Tuesday, September 21, 2010

Altered Photography with the Altered Sisters

by Jeme Baker

Recently, it was my turn to teach a technique at our monthly Altered Sisters meeting.  Everyone seemed enthused when I showed some of my altered photography results a few months ago so that became my gig for the morning. 

It must have been a successful meeting and technique because for the first time in recent memory, even the die-hard lunch goer-outers didn't go.  We stayed working and playing for a couple of hours.

As is typical for me, I forgot to take pictures during the time we were together.  But, I do have some of the results of the morning from a couple of the Sisters.  Hand altering photography is such fun and offers great potential to turn even bad photos into something really cool.

So, now, please enjoy the work of Jeme Baker, Lynn Contos, Joanne Huffman and Cathwren Warner.


by Jeme Baker

by Jeme Baker

by Lynn Contos

by Lynn Contos

by Joanne Huffman


by Joanne Huffman

by Joanne Huffman

Self Portrait by Cathwren Warner

by Cathwren Warner


I think these are just amazing.  Dig out those photos folks and see what you can do with them!

Lorrie

Thursday, April 22, 2010

Andrea Peterson Workshop - My Pulp Painting Results

Continuing with the Andrea Peterson workshop...  here is my work from the pulp painting frenzy.  None of these are finished.  But, all (I think) have potential...


Poured pulp and a little brush work.  This was the last one I did of the day and it took me about 5 minutes.  I think it has the most potential.  Don't you think that I'd learn one day that the stuff I labor and fuss over is usually less good?

Playing with orange.


1.  Pull white sheet.  2.  Pour blues and purple.  3. Use stencil for flower blossom.  4.  Use dental syringe for orange squiggles.  5.  Wrinkles are bugging me.

This one was also toward the end of the day.  I used mostly leftover colors just to get ride of them.  Fence stencil used on the bottom.

Poured background, drips made by flinging pulp with a spoon tip, brushed on brown pulp over a stencil.
I made the fence stencil during the workshop.  Original photo is from our trip to Monticello last year.


Next steps on all of these is probably to go back in with pastels and/or ink.  We'll see.

Andrea's studio, Hook Pottery Paper in LaPorte, IN, is not far from here and several Guild members and I hope to made a road trip this summer to see her set-up (she uses sustainable art practices whenever possible) and spend more time with this really cool lady.

Lorrie

Monday, April 19, 2010

Andrea Peterson Workshop

The Handmade Paper Guild typically brings in one or two artists each year for a workshop.  Sometimes we focus on surface design, other times bookbinding, papier mache, or another paper-related technique.  But this year it was back to our roots:  handmade paper.  We enjoyed the company and knowledge of papermaker Andrea Peterson of LaPorte, IN.  She is amazing!  I'm very happy to have met her and benefit from her expertise.  The workshop, with 13 Guild members, was held at the Kalamazoo Book Arts Center.

The workshop was all about pulp painting.  I'm not talking about just squirting overbeaten pulp from a ketchup bottle onto a freshly pulled sheet of paper (although we did that).  She talked about the chemistry of it all (and made it interesting).  She demonstrated how to color the pulp with pigments and retention aid so that the pulp was really highly saturated.  We then each had to try to match a paint chip so that not only was the color correct but it didn't bleed either (sounds easy, it's not).  Then big fun:  using stencils, paint brushes, titanium white, dental syringes, spoons, cups, ketchup bottles, spray misters and other tools, we experimented.  Into the press and then voila, finished masterpieces.  Ok, I'm getting carried away.  No masterpieces maybe, but all good tries anyway. 


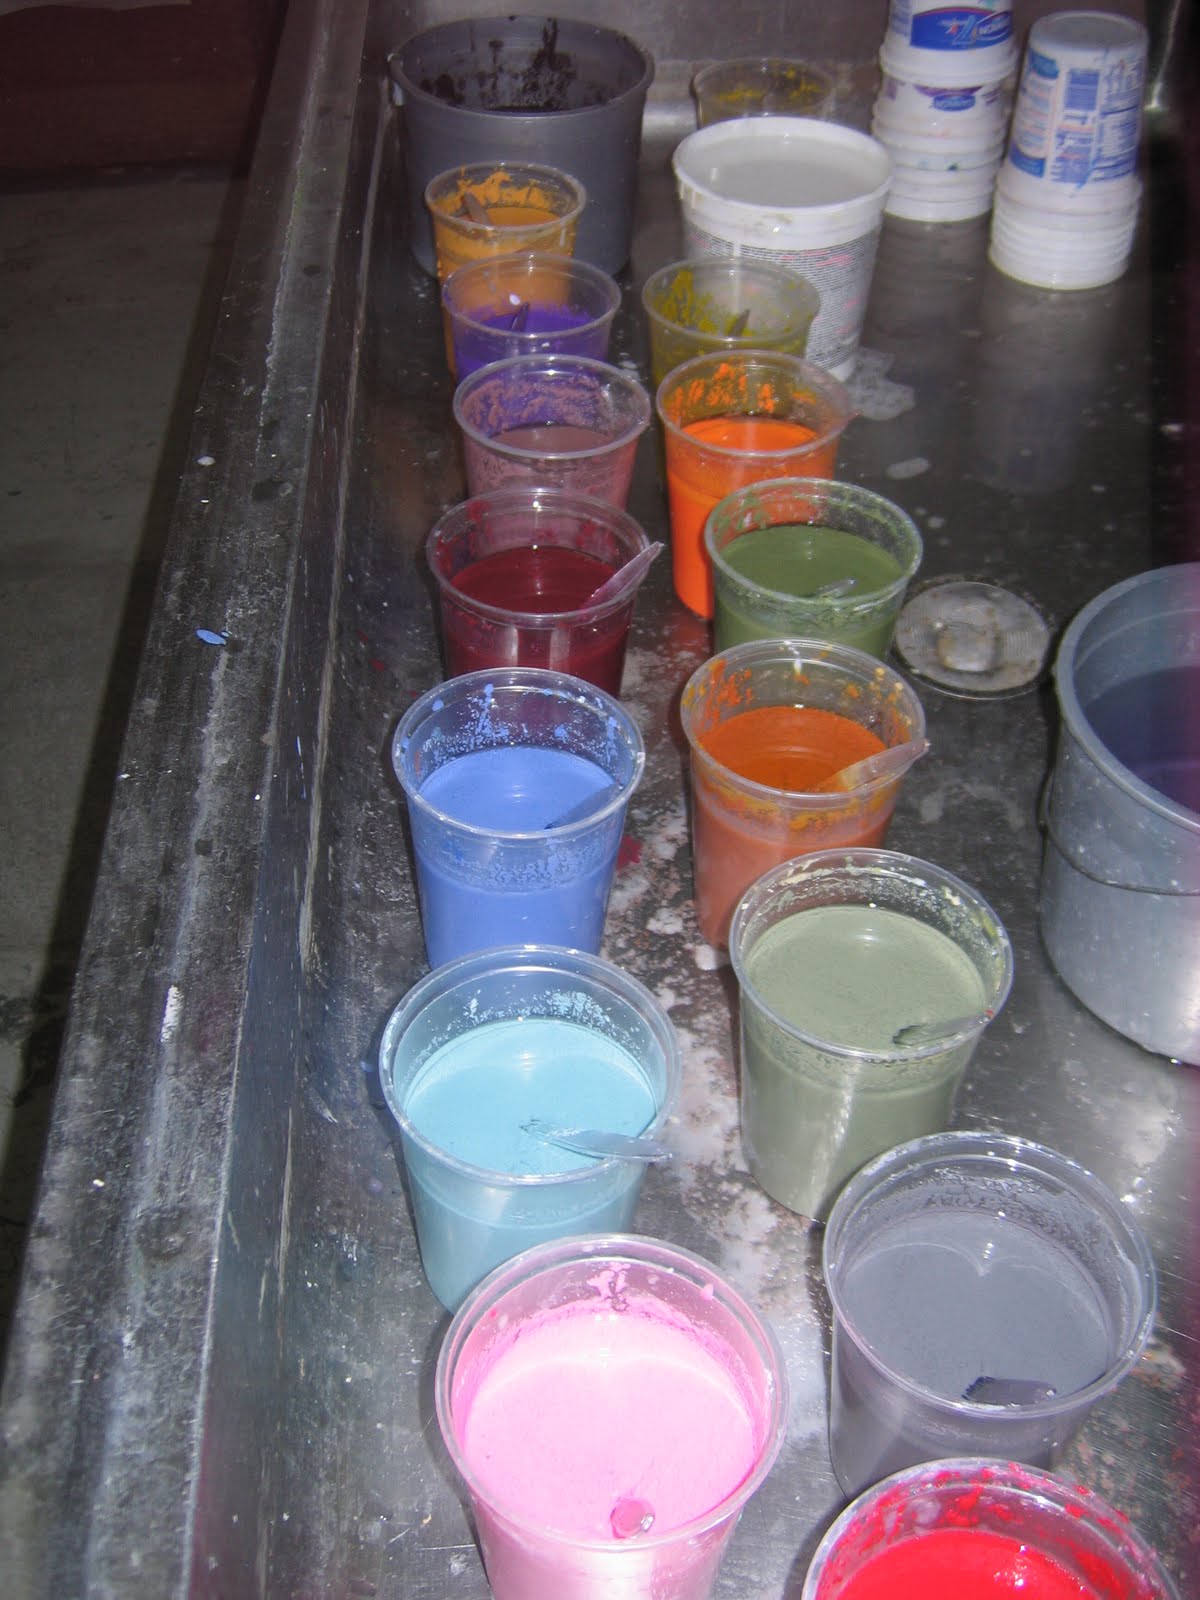
Here are sample colors.  I mixed the orange.  You can see how the bottom left blob is bleeding so more retention aid was added until the bleeding stopped.


The cups of colored pulp that became our pallete.  We used white, buff and gray sheets as our base.


Sally, Lauren, Judy, Alice and Sally working away...


Pouring pulp and using a brush to paint the pulp on the surface.


Preparing to use a stencil.


Barb and MaryJo pulling sheets out of the press.


An experimental group project where each person made a mark of some kind with the color that they had mixed.


At the end of a long, productive day...
Andrea Peterson, instructor
Eve Reid, founder of Handmade Paper Guild and Andrea's hostess 
Sally Rose, professor at Central Michigan University
Lorrie Grainger Abdo, workshop coordinator


Can you tell that it was more than a full day and we all went home exhausted?  Many, many thanks to Andrea for a great day. I'll show you my results from the experience in the next post...

Lorrie


Thursday, February 25, 2010

More Altered Photography...

More before and after samples from the Altered Photography class...


Naples pier, Florida


Sculpture park in Seattle, Washington


Fort Worden in Port Townsend, Washington

Hand altering photos gives bad photos a new life and can make already decent photos more interesting. You can make them colorful and silly or go with the look of your choice: classy, serious, ghostlike, beautiful, scary, thoughtful...

Lorrie

Related Posts with Thumbnails